Thursday, March 10, 2016

Sending Good Thoughts for SAB 2016

Hello everyone!

Well, this is the last month of SAB and sure has been a good one for me!  There are so many terrific items in the 2016 Occasions catalog to chose from and equally awesome items from the SAB brochure.

The first card I have was CASE'D from another I saw Pintrest awhile ago.  I changed up the colors, but basically the general design is the same.  Made using the Botanical Blooms stamp set, coordinating dsp and framelits, it's easy to make quick cards with this set.  And BONUS it's available as a bundle so you save 15% on all three items!!  The bundle price is $51.75, which automatically gives you an SAB item!


My next card uses the Honeycomb Happiness SAB set.  I just love this little chick and it can be used for so many things!  The sentiment is from another SAB set, Perfect Pairings.  Combined with the new balloon punch and you have a cute birthday card for any age!


Don't forget SAB ends on March 31st!  So get these limited time items by then!  To see what's next on the tour, click on Audra Monk and enjoy!


Happy Stamping!!!

Ann  :)


Thursday, February 11, 2016

Love is in the Air!!!

Hello everyone!!! 
 
As you know every year at this time SU! has one great big Sale-A-Bration!!!  Or SAB as we say.  By spending $50 or more in product, you have the choice of several wonderful items for free!
 
Last month at my stamp club we made these adorable Valentine's pocket cards using the awesome Mini Treat bags thinlets.  While you may look at the price for these thinlets, $40, and think that is way too much, look again at everything you get with them!
 
On this pocket card the treat bag thinlet was used, but you also get the "for you" and the heart.  Plus way more than that!
 
And when you put the 6 x 6 paper pad from the Occasions catalog and the Tip Top Taupe lace, you well over your $50 and have earned yourself a free SAB item.


One of the free SAB items I have received, and it's only available until February 15, 2016, is the adorable set The Sky is the Limit!  I just love that plane!  The dsp used here is also an SAB item only available until 2/15/16.

 
So to see more great projects from the Remarkable stampers, head on over to Audra Monk's blog for the next stop!

 
Happy Stamping!!!
 
Ann :)

Thursday, December 10, 2015

Last Minute Holiday Gifts!!!

It's that time of year again!  Almost Christmas, and if you're anything like me, scrambling at the last minute for gifts!!  I try very hard each year to give handmade gifts, because what else would all this stamping and scrapping stuff be for??

I made up this cute, and quick, gift to have on hand for a last minute gift.  I took one of the many empty jars I have and created this candle in a jar.


I simply wrapped a piece of burlap around the middle of the jar, fraying the edges just a bit.  I used the Watermelon Wonder lace to tie over that for added color.  Then using the Flurry of Wishes stamp set, I stamped the large snowflake in Blushing Bride and the medium snowflake in Calypso Coral.  Now the medium snowflake you can punch out with the coordinating punch, but yes I did fussy cut the large snowflake.  It really didn't take that much time to cut them out.


Using double layer dimensionals I adhered the snowflakes either together, or directly onto the jar.  Once I had the snowflakes on, I placed an Ice Rhinestone in the center of each snowflake.  And for just a bit of added texture, I tied some of the extra burlap strings around the front bow.


I need to put a bit more sand in the jar, but the candle is hot glued to the bottom of the jar for stability.


Quick and cute gift for someone!!

To see the next blog in the lineup click here Audra Monk or click on the graphic below.


Enjoy the tour everyone and I hope we have inspired you on last minute gift ideas!!!

Happy Stamping!!

Ann  :)


Thursday, October 8, 2015

Project Life - Seasonal Snapshot 2015

Have you tried Project Life yet???  I have to admit that I was a bit hesitant, scared and intimidated when Stampin' Up! first started carrying Project Life. I was used to, and comfortable with, scrapbooking in the "normal" way!  But once I started playing with the awesome kits that SU! carries for Project Life, I was hooked.

Last month I was chosen by my upline, Janet Wakeland, to be a display stamper using the Seasonal Snapshot 2015 kit.  This kit is in the current 2015 Holiday catalog and covers all fall/winter holidays!!  When you purchase all of the coordinating products:  the stamp set, card collection and accessory pack, you can do so much!

I love the versatility of this kit.  From school days to Christmas, you can do so many different things! The projects I have here give you a sample of what can be done!

The first project is a Halloween card using the popped out pieces from the pumpkin wood shape.  The pumpkin was cut with the 3" circle framelit and ran through the big shot with the Woodgrain embossing folder.  I wanted to mimic the texture on pumpkins.  The bats are in the stamp set and were stamped in black Staz on on Blackberry Bliss.  A piece of the corrugated Crumb Cake paper for the stem and Old Olive leaves punched from the Builder Bird punch.


I used the new Whisper White thick cardstock for the base, spritzed some Pumpkin Pie color on the background and accented it with the fabulous Black Glimmer paper!   Perfect Halloween card!


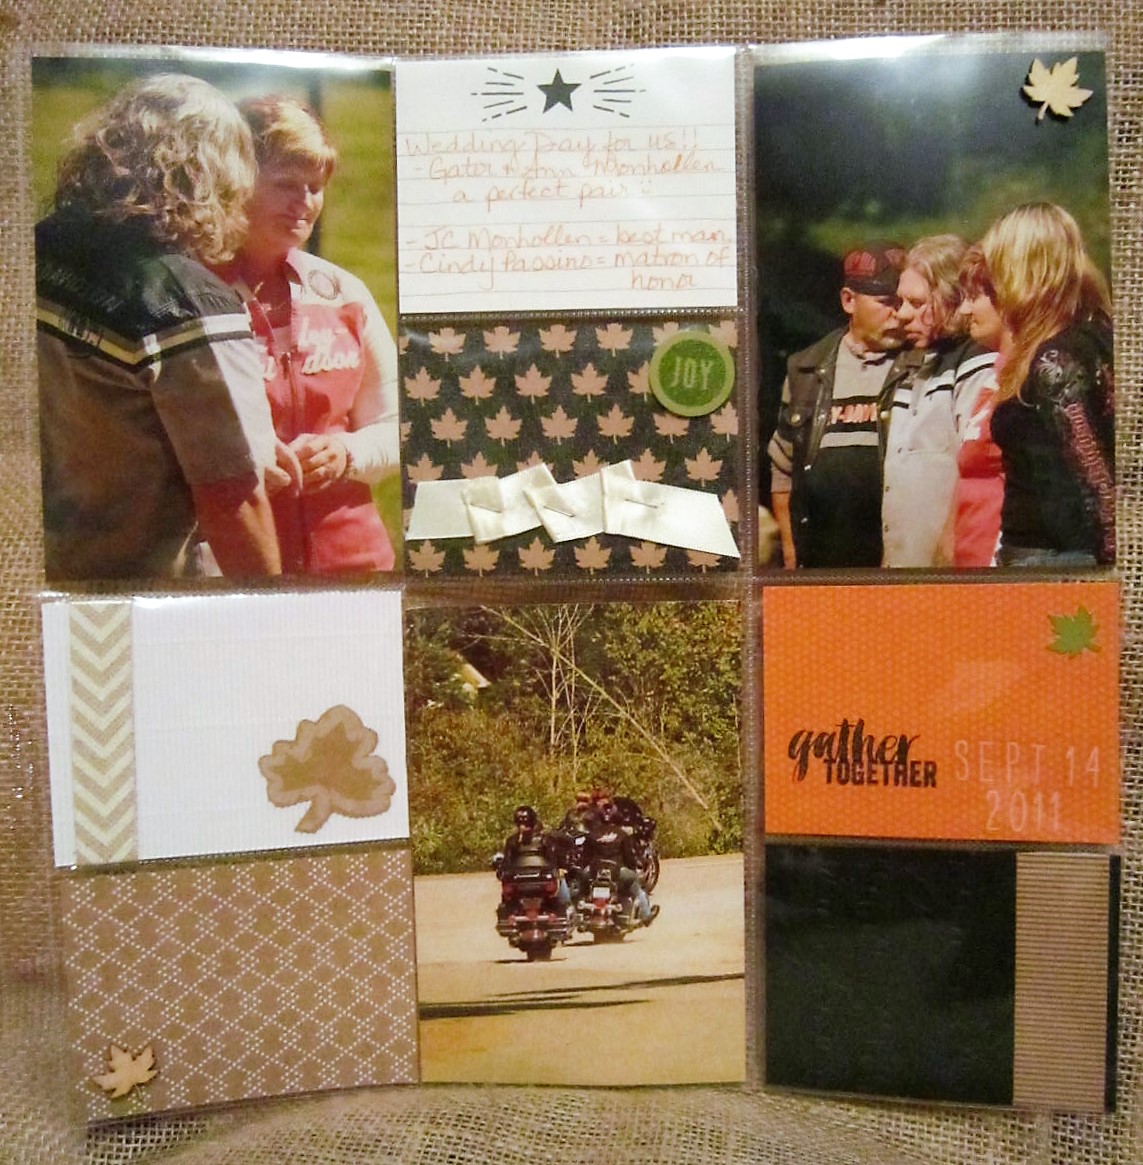
My next project shows a traditional Project Life page.  I used our wedding pics since we did get married in September, which technically is in fall!


But what this really shows, is how super easy it is to complete a page using the Project Life kits.  I used items from all the items available with the bundle.  The Project Life cards make it quick and easy to assemble your page and then using some specialty paper adds to it.  It's hard to see in the picture, but the black piece was embossed with the Woodland embossing folder.  Wooden leaves adhered to the outside of the pages just enhance the dimension of the page.

Hope you enjoyed your stop on my blog during this month's tour!!  Up next on the tour is Audra Monk!  You can click on the icon below to take you there.


Happy Stamping!!!

Ann

Thursday, September 10, 2015

Peaceful Pines for Christmas

Hello everyone!  I'm glad to have to have you stop by as part of the RemARKables "Home for the Holidays" blog tour!  This is my first time participating in a blog hop, and I'm super excited to be a part of it and to share my projects with you!!

The blog hop is showcasing the various bundles available to you in the new SU! 2015-16 Holiday catalog and the 2015-16 Annual catalog.  For my projects I have used the Peaceful Pines bundle. With this bundle you receive the stamp set and the matching framelits for $45.  Quite the deal as it saves you a ton of time from cutting out all the trees and smaller, intricate add ons.

My first card uses one of the large trees (there are 2).  I just love the saying on this tree!  The Crumb Cake circle was a scrap, as was the Real Red background piece.  The designer paper is from the Merry Moments paper stack and cut with the new Triple Banner Punch.

The Real Red background as well as the circle are popped up with dimensionals.  The tree is popped further with more dimensionals.  Some gold sequin trim and white organdy ribbon finish it off! Stapled on with our awesome stapler and colored with a gold sharpie to help it "match"!


My second card uses the medium and large trees for a layered look.  The medium tree was stamped in Real Red and layered with an Old Olive tree cut with the large framelit.

Again, this card was made using mostly scraps that were laying on my craft table!  Love I can put a card together like this using my scraps!!  Another Crumb Cake circle as the "background" for the tree popped up with dimensionals.  I used a strip of non SU! off white burlap under the Real Red and Old Olive banners.  The burlap loops are from leftover pieces off the strip.

The snowflake was stamped in Crumb Cake.  I love the feel it gives of snow falling.


Well, I hope you have enjoyed my projects and I hope they inspire you to get your Christmas cards started!  Christmas will be here before we know it!!

Click on the button below for the next blog on the tour - Audra Monk!


Happy Stamping!!!

Ann

Tuesday, September 1, 2015

Up cycled chunky picture frame!!!

Made this awhile ago and realized I haven't shared it!!
I bought the frame a LOOOONG time ago, intending on doing something with it! It originally was pink with brown crowns all over it. I painted it a soft ivory with paint I used in my living room paint job. It's a nice chunky wood frame. Once it was painted, I covered the front in a piece of off white burlap, adhered with spray adhesive.
The flowers were made with the now retired Amore fabric from SU!. The three small flowers are rolled and topped with a gold metal button. The larger flower was made using the 3 inch circle die and then folded over and hot glued to a piece of felt. The leaves are made from the Mossy Meadow satin ribbon. The ruffled burlap ribbon came from Hobby Lobby.
I love how it came out and how it really makes the photo pop! That is a picture of my husband and I on our wedding day, riding off after we were officially married!!


Thanks for looking and Happy Stamping!!!

Ann

Friday, August 14, 2015

A Hoot of a Halloween!!!

Hello all!!

With fall, and Halloween, fast approaching I've been playing around with some ideas for it.  My stamp club gals are not always into investing in Halloween specific stamps, so I wanted to come up with some alternatives using other items.

This card uses everyday stamp images/punches, but in a Halloween way!  I was playing around with my Sprinkles of Life set and coordinating punch, and this idea just kind of popped into my head!

I haven't played with my owl punch in a looooong time, but I love how he fits in beautifully with Halloween.

Since I was just playing around for me right now, some of the items on here are retired now.  The base card, and top layer, are using Confetti Cream.  I ran the top layer through the Big Shot using the Woodgrain embossing folder.  Finished that off with some sponging in Early Espresso to give the look of a tree.  The circle was punched using the 2 1/2" circle punch.  I wanted the owl to appear as if he sitting inside the tree.  The branch he is sitting on is from Sprinkles of Life.  Stamped in Chocolate Chip onto Chocolate Chip card stock.  I used two.

My idea for the clouds was to give them a "dark night" look.  They were stamped in Smoky Slate ink and then I used Marina Mist and Basic Gray stampin' markers to give them  the dark night look.  I blended the colors with a blender pen.  For a little added punch I put crystal effects on the colored parts.

The sentiment comes from Teeny Tiny Wishes.


So, what do you think?

Happy Stamping,

Ann